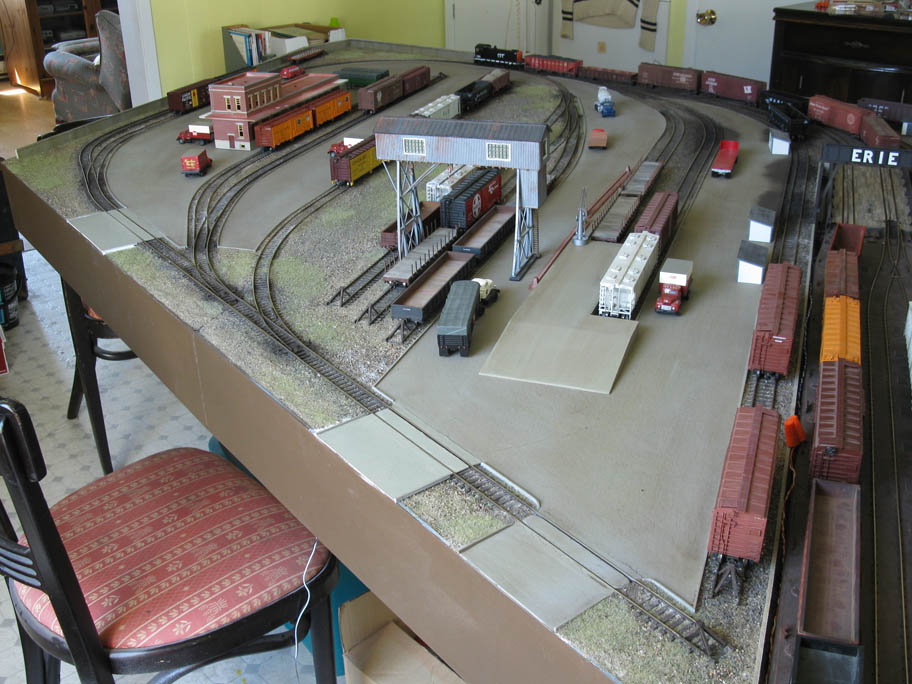
Last week, with the help of my father, we moved the layout to its final destination in Jérôme's basement.
While the layout was design as two modules, we didn't felt great about the idea to cut the rails and risk to cause much more problem than required.
It was finally decided to move the layout as is in a trailer. Yes, we had some doubt and the streets weren't in great shape but I'm happy to report nothing broke during the move.
I must admit I'm really impressed by the sturdiness of the waffle-type module building technique. It's very strong, lightweight and gives plenty of "handles" to grasp the layout when moving it.
The final coat of paint on the fascia and last coat of acrylic gel on the water will soon be applied.
Meanwhile, the freight car fleet is now completely assembled, totally 60 cars including boxcars, gondolas, open hoppers, reefers and flatcars. 20 out of 60 are in various state of completion from adding details and weight to final weathering. The shortage of Dullcote at my local hobby store hampers greatly my progress. I missed the days when more than 4 of 5 local shops used to carry Dullcote. Anyway, I still have to wait to get all the CDS dry transfers I ordered last week.
Showing posts with label Layout Construction. Show all posts
Tuesday, 9 August 2016
Sunday, 10 July 2016
Nice Boat!
Today Harlem Station reached another historical step in its ongoing history. Adding boats to a marine scene is truly the only way to make it believeable.
I finally completed the tugboat "Chicago" today by gluing some accessories. By far, I'm very satisfied by results because there's very little discrepancies with the real prototype. Unfortunatley, I can say the same about my failed attempt to convert the 1:72 Revell Coast Guard Tugboat which could someday end up on another layout or diorama.
Color pictures of Erie tugboats in the 50s show them quite shiny and well-maintained thus I decided to kept Chicago relatively clean.
Sunday, 19 June 2016
1 Concrete Ramp & 4 Grade Crossings
As promised, here is a general overview of different new upgrades on the layout. As you can see on these pictures, the layout is now in its second operation session.
A new styrene concrete ramp now graces the twin team tracks. It follows the prototype as closely as permitted by source material.
Also, two new grade crossings were added according to recent discoveries. They aren't yet weathered and ground cover isn't yet complete. Also, a third wood and dirt grade crossing will soon be added in front of the freight station.
Finally, another improvement was the addition of coal dust spills over the concrete ramp following prototype picture. They truly help to kill the fake look of concrete and I'm planning to add a little bit more weathering in the long run.
I also started to work on the gantry crane. It isn't an exact replica of the real one at Harlem Station because I did want to use parts I had on hands. However, it follows the general lines and I believe it will work as a decent model.
I'll probably use the same approach about the small coal dealers' structures to save on time and material. While I want the layout to be as close as I want, I still have a time limit to complete the project and Jérôme - the future owner of the layout - want a decent depiction of Harlem Station and not a prize-winning museum model.
On the good side, I found some old suitable models to populate the layout. I still need Erie boxcars thought!
A new styrene concrete ramp now graces the twin team tracks. It follows the prototype as closely as permitted by source material.
Also, two new grade crossings were added according to recent discoveries. They aren't yet weathered and ground cover isn't yet complete. Also, a third wood and dirt grade crossing will soon be added in front of the freight station.
Finally, another improvement was the addition of coal dust spills over the concrete ramp following prototype picture. They truly help to kill the fake look of concrete and I'm planning to add a little bit more weathering in the long run.
I also started to work on the gantry crane. It isn't an exact replica of the real one at Harlem Station because I did want to use parts I had on hands. However, it follows the general lines and I believe it will work as a decent model.
![]() |
| Sorry, the workshop is a real mess right now! |
I'll probably use the same approach about the small coal dealers' structures to save on time and material. While I want the layout to be as close as I want, I still have a time limit to complete the project and Jérôme - the future owner of the layout - want a decent depiction of Harlem Station and not a prize-winning museum model.
On the good side, I found some old suitable models to populate the layout. I still need Erie boxcars thought!
Saturday, 11 June 2016
Updates, Requests & Questions
The project reached a interesting level of completion and some aspects need to be addressed.
I also started to build the concrete ramp out of styrene. It's already in the weathering process and when dry, it will be permanently glued on the layout with epoxy.
According to historic pictures of Harlem Station, here is a list of suitable cars to give you an idea of what I'm looking for. Sure, Erie cars should be a priority.
40ft Steel and OSB wood boxcars: mainly Erie, Pennsylvania, Milwaukee Road, Southern, Norfolk & Western, ATSF (Chief, DF), Monon
Steel hoppers (varied prototype): Erie, Pennsylvania, Reading, Lehigh Valley.
40ft & 50ft Flat cars: North Eastern Roadnames.
40ft & 50ft Gondolas: North Eastern Roadnames.
40ft Reefers: FGE (steel, insulated with plugdoor), wine (Chateau Martin, etc.)
Feel free to contact me at matlac@gmail.com
Here's a more comprehensive list I once made:
Chris Schmuck kindly remarked another road crossing existed near the freight house. This area was never documented during Harlem Station's existence.
First: What's the exact location of the crossing (photographic evidence?). Here are two options.
Second: I need information about the freight house. The facade on East 150th Street is never depicted on photos I've seen so far, particularly the 2 storeys part. Any hints or factual information would be appreciated.
Updates
Grass and weeds are almost completed. I also started to heavily weather the concrete pads, particularly in the coal dealer areas. It's quite promising and it blends everything together nicely.I also started to build the concrete ramp out of styrene. It's already in the weathering process and when dry, it will be permanently glued on the layout with epoxy.
Requests
I'm looking for second hand or unbuilt cars to populate the layout, mainly from North Eastern roads. I'm open to any reasonable offer and cars can be old kits or RTR models, as long as they are suitable for the mid-1950s and fit the theme. I have no preference for manufacturers, as long as they are decent. But remember, no trainset quality stuff (Model Power, old Life-Like, Bachman, Tyco, name it).According to historic pictures of Harlem Station, here is a list of suitable cars to give you an idea of what I'm looking for. Sure, Erie cars should be a priority.
40ft Steel and OSB wood boxcars: mainly Erie, Pennsylvania, Milwaukee Road, Southern, Norfolk & Western, ATSF (Chief, DF), Monon
Steel hoppers (varied prototype): Erie, Pennsylvania, Reading, Lehigh Valley.
40ft & 50ft Flat cars: North Eastern Roadnames.
40ft & 50ft Gondolas: North Eastern Roadnames.
40ft Reefers: FGE (steel, insulated with plugdoor), wine (Chateau Martin, etc.)
Feel free to contact me at matlac@gmail.com
Here's a more comprehensive list I once made:
| Roadname | Type | |||
| Erie | Steel boxcar | |||
| Erie | OSB boxcar | Accurail 4116 | ||
| Erie | Twin hopper outside brace | 26551 | ||
| Pennsy | Old 40' steel boxcar | Round Keystone | ||
| Reefer | ||||
| Pennsy | OSB boxcar 8 panels | Accurail 4304 | ||
| MILW | OSB boxcar 6 panels | Accurail 7005 | ||
| D&H | Outside brace steel hopper | |||
| C&O | Steel boxcar DD | With the logo | ||
| PFE | Wood reefer | |||
| 50ft gondola | ||||
| ATSF | Steel boxcar 50ft | DF logo | 11129 | |
| N&W | Steel boxcar DD | 43384 | ||
| Pennsy | Twin hopper g panel | |||
| Pennsy | Quad hopper 10 panel | |||
| Erie | Boxcar | Big logo | ||
| ATSF | Steel boxcar | Chief | ||
| B&O | Steel boxcar | |||
| Ann Arbor | Steel boxcar | |||
| Erie | Gondola | |||
| Monon | 50ft boxcar | |||
| PFE | 50ft reefer | Yellow | ||
| N&W | Steel boxcar | Large lettering | ||
| W&M | Rib hopper | |||
| CNJ | Steel flat hopper | 55 ton | ||
| Lehigh Valley | Hopper 55 ton | |||
Questions
Chris Schmuck kindly remarked another road crossing existed near the freight house. This area was never documented during Harlem Station's existence.
First: What's the exact location of the crossing (photographic evidence?). Here are two options.
Second: I need information about the freight house. The facade on East 150th Street is never depicted on photos I've seen so far, particularly the 2 storeys part. Any hints or factual information would be appreciated.
Thursday, 9 June 2016
Some Greenery
Even a highly contaminated and mineral area like Harlem Station wasn't a sterelized place like we would like to believe.
Following historic photos, some vegetation found its way among the tracks and empty spaces surround the station. I tried to capture this appearance by using static grass. It's a mix of 3 colors, including straw yellow, greyish green and a Noch spring mix. In few area, grass was applied in two or three layers to add depth and variation.
While grass isn't a overwhelming presence on the layout, it does help to throw some randomness in that sea of dirt and concrete. I'm not sure if I'll add weeds and larger plants because old pictures mainly show very short grass here and there.
Following historic photos, some vegetation found its way among the tracks and empty spaces surround the station. I tried to capture this appearance by using static grass. It's a mix of 3 colors, including straw yellow, greyish green and a Noch spring mix. In few area, grass was applied in two or three layers to add depth and variation.
While grass isn't a overwhelming presence on the layout, it does help to throw some randomness in that sea of dirt and concrete. I'm not sure if I'll add weeds and larger plants because old pictures mainly show very short grass here and there.
Tuesday, 7 June 2016
Weathering Concrete and Soil
Pictures of Harlem Station show the area was extremely dirty. The concrete pads were covered in coal dust and mud while the roadbed was a grungy mess with oil stains.
To reproduce this characteristic on the layout, it is crucial to do a weathering process following several steps.
Following several prototype pictures, I dusted the carfloat apron area with lots of weathering powder to reproduce the very dark and dirty look of the ballast. Following this application, a oil paint wash was applied.
Black weathering powder was also applied over the coal spills on the tracks.
Finally, a very liberal dirty oil paint wash was applied with a large brush over the concrete pads. Prior to this application, I carefully scribed a few cracks to give some texture to the cardboard surface.
This is only the beginning since the pictures show the concrete was far more dirty than that. The soil at Harlem Station must be extremely contaminated!
To reproduce this characteristic on the layout, it is crucial to do a weathering process following several steps.
Following several prototype pictures, I dusted the carfloat apron area with lots of weathering powder to reproduce the very dark and dirty look of the ballast. Following this application, a oil paint wash was applied.
Black weathering powder was also applied over the coal spills on the tracks.
Finally, a very liberal dirty oil paint wash was applied with a large brush over the concrete pads. Prior to this application, I carefully scribed a few cracks to give some texture to the cardboard surface.
This is only the beginning since the pictures show the concrete was far more dirty than that. The soil at Harlem Station must be extremely contaminated!
Sunday, 5 June 2016
Improvements, Wiring and Operation
Motivation came back and work has resumed on Harlem Station. The first major modification was changing the bluish gray color of the concrete pad by a more prototypical light tan color. It was easier to do than anticipated but required a lot of masking tape!!!
It was also time to glue the steel girder on the wood supports over the pontoon. Some details and weathering are still lacking.
Then it was time to do the wiring. With Jérôme's help, we did a minimal job here. Cleaning the rails, turnouts and connections was a real pain and there's still a lot of work to do. Later, I want to improve the wiring a little bit. But let's just say we can run train with not too much hiccups to be bothering.
The third thing to do was to add weight to the freight cars à la Confalone. Why? Because with radii as sharp as 13", normal freight cars have a tendency to derail at an alarming rate. Now, the cars all weight around 8 to 9 oz and they performed flawlessly during our first mock up operation session. Must I stress the layout is an "exact" replica of Harlem Station and that 50ft cars did find their way without problem - albeit at low speed - on this intricate set of tracks. Forget the fancy Bronx Terminal, Erie built a spartan affair without using a single curved turnout.
And finally, we enjoyed the first ever operation session on Harlem Station since the late Carl Arendt wrote about my project back in the days. I'm pretty sure he would have loved to hear about our impressions. Let's just say it is a very strange experience to be facing a model railroad devoid of any selective compression. What we saw and the miles we travelled were the real thing. That's quite impressive.
Our improvised operation session took an hour at a leasure pace. We spotted 12 cars and pulled out the same number. The carfloat wasn't at full capacity, so I guess 90 minutes would be required if it was the case.
We had to improvised a little bit how to handle the cars, but it looks like you are almost forced to use the carfloat as a yard because there is no place to store all the cars on the property. It may sounds inefficient, but in fact it isn't. After a few moves, we got a good grasp of the pattern.
What is strange with such a small layout standing in the middle of the room is tthat you feel you are playing at some king of board game. Quite weird. We were sitting during the entire session with the layout at eye level. The weirdest thing of all was to be standing where famous pictures of Harlem Station were shoot 60 years ago. Since the layout is accurate, the panorama is exactly the same.
It was also time to glue the steel girder on the wood supports over the pontoon. Some details and weathering are still lacking.
Then it was time to do the wiring. With Jérôme's help, we did a minimal job here. Cleaning the rails, turnouts and connections was a real pain and there's still a lot of work to do. Later, I want to improve the wiring a little bit. But let's just say we can run train with not too much hiccups to be bothering.
The third thing to do was to add weight to the freight cars à la Confalone. Why? Because with radii as sharp as 13", normal freight cars have a tendency to derail at an alarming rate. Now, the cars all weight around 8 to 9 oz and they performed flawlessly during our first mock up operation session. Must I stress the layout is an "exact" replica of Harlem Station and that 50ft cars did find their way without problem - albeit at low speed - on this intricate set of tracks. Forget the fancy Bronx Terminal, Erie built a spartan affair without using a single curved turnout.
And finally, we enjoyed the first ever operation session on Harlem Station since the late Carl Arendt wrote about my project back in the days. I'm pretty sure he would have loved to hear about our impressions. Let's just say it is a very strange experience to be facing a model railroad devoid of any selective compression. What we saw and the miles we travelled were the real thing. That's quite impressive.
![]() |
| Some action during the operation session |
Our improvised operation session took an hour at a leasure pace. We spotted 12 cars and pulled out the same number. The carfloat wasn't at full capacity, so I guess 90 minutes would be required if it was the case.
We had to improvised a little bit how to handle the cars, but it looks like you are almost forced to use the carfloat as a yard because there is no place to store all the cars on the property. It may sounds inefficient, but in fact it isn't. After a few moves, we got a good grasp of the pattern.
What is strange with such a small layout standing in the middle of the room is tthat you feel you are playing at some king of board game. Quite weird. We were sitting during the entire session with the layout at eye level. The weirdest thing of all was to be standing where famous pictures of Harlem Station were shoot 60 years ago. Since the layout is accurate, the panorama is exactly the same.
Friday, 3 June 2016
Return to Harlem Station
It's been a while since I had the chance and desire to work on this project. But summer is back and my interest in it too.
Most general aspect of the project are done. But a lot of structures and scenery are left to be done.
As a matter of fact, the big let down for me is the concrete pads color. Their bluish gay hue doesn't look very convincing to me. The contrast with the dirty soil around them is far too stark to be credible.
According to old pictures, the concrete pads were quite light in color, but no bluish at all. Much more a light tan. Before moving on with scenery, I'm seriously thinking about repainting the whole thing with a more natural tone. It means a LOT of masking in perspective. When done, it should be similar to the concrete retaining walls on the perimeter.
On a positive note, we will soon implement DCC on the layout. Since I started the project last summer, no train ever ran on it!
Most general aspect of the project are done. But a lot of structures and scenery are left to be done.
As a matter of fact, the big let down for me is the concrete pads color. Their bluish gay hue doesn't look very convincing to me. The contrast with the dirty soil around them is far too stark to be credible.
According to old pictures, the concrete pads were quite light in color, but no bluish at all. Much more a light tan. Before moving on with scenery, I'm seriously thinking about repainting the whole thing with a more natural tone. It means a LOT of masking in perspective. When done, it should be similar to the concrete retaining walls on the perimeter.
On a positive note, we will soon implement DCC on the layout. Since I started the project last summer, no train ever ran on it!
Wednesday, 23 December 2015
Bridging the Gap
Sometimes, solutions are easier than first envisionned.
Last week, we tackled the problem of electrifying the carfloat and the float bridge. The answer was to run feeders from beneath to every stock rail.
The carfloat required I drill small holes against the rail to insert the feeders. Once putty and paint completed, it should be barely noticeable.
The wires were then connected together under the carfloat sloping hull. This part is invisible when the float is on the layout, so we didn't bother making it fancier than required. A male connector will make it possible to plug the carfloat on the layout bus wires. More about that later.
Feeding the float bridge required a little bit more ingenuity. My main concern was that the bridge could be removed anytime and wouldn't be directly connected with the main layout trackage. Using rail joiners wasn't an option to me. We thus decided to feed the rails with small copper wires soldered on each rail ends. Near the turnout, it meant the wire made a loop connected to insulated wire.
Once again, a male connector was also soldered to the bridge wires to make it plug-and-play. Since we don't plan to use the layout without the carfloat, all wires are visually hidden under normal circumstances. A little paint will make them disappear.
As you can see, when seen from top, you can hardly think all this wiring is running under the structures. You can also notice I added Frenchman River Models float bridge mechanism. Quite easy to put together and bring a lot of life to the model.
Finally, we soldered a pair of female connector on feeder wires. A hole will be drilled behind the pontoon and feeders will be soldered to bus wire in a traditional way. The carfloat and float bridge will then be plugged on it.
Last week, we tackled the problem of electrifying the carfloat and the float bridge. The answer was to run feeders from beneath to every stock rail.
The carfloat required I drill small holes against the rail to insert the feeders. Once putty and paint completed, it should be barely noticeable.
The wires were then connected together under the carfloat sloping hull. This part is invisible when the float is on the layout, so we didn't bother making it fancier than required. A male connector will make it possible to plug the carfloat on the layout bus wires. More about that later.
Feeding the float bridge required a little bit more ingenuity. My main concern was that the bridge could be removed anytime and wouldn't be directly connected with the main layout trackage. Using rail joiners wasn't an option to me. We thus decided to feed the rails with small copper wires soldered on each rail ends. Near the turnout, it meant the wire made a loop connected to insulated wire.
Once again, a male connector was also soldered to the bridge wires to make it plug-and-play. Since we don't plan to use the layout without the carfloat, all wires are visually hidden under normal circumstances. A little paint will make them disappear.
As you can see, when seen from top, you can hardly think all this wiring is running under the structures. You can also notice I added Frenchman River Models float bridge mechanism. Quite easy to put together and bring a lot of life to the model.
Finally, we soldered a pair of female connector on feeder wires. A hole will be drilled behind the pontoon and feeders will be soldered to bus wire in a traditional way. The carfloat and float bridge will then be plugged on it.
Tuesday, 22 December 2015
Some progress? Yes!
It's always crazy to discover how much interest this project is gathering. New York City rail-marine terminals are truly a dear child of this hobby.
I didn't update the blog over the last months because my energies were focussed on my other project: Hedley-Junction.
However, I did some work on the layout, including some painting and wiring. The layout was initially designed to be battery-operated. But financial and technical constrains put a end to that adventure. It will be DC powered with a possibility to be converted easily to DCC.
We actually have wired the carfloat and float bridge in such a way a locomotive will be able to travel EVERYWHERE. You read me well, everywhere. Old pictures of Harlem Station show no idle cars were used and the locomotives ventured onto the carfloat. We will reproduce that while operating the layout.
I don't know if I'll be able to push detailing and scenery work as far I first hoped, but the layout will be soon delivered to Jérôme, the final end user. So far, he's been extremely satisfied with what he have seen and no wonder why. He's an operation fan and I feel this layout will fit his needs perfectly.
I didn't update the blog over the last months because my energies were focussed on my other project: Hedley-Junction.
However, I did some work on the layout, including some painting and wiring. The layout was initially designed to be battery-operated. But financial and technical constrains put a end to that adventure. It will be DC powered with a possibility to be converted easily to DCC.
We actually have wired the carfloat and float bridge in such a way a locomotive will be able to travel EVERYWHERE. You read me well, everywhere. Old pictures of Harlem Station show no idle cars were used and the locomotives ventured onto the carfloat. We will reproduce that while operating the layout.
I don't know if I'll be able to push detailing and scenery work as far I first hoped, but the layout will be soon delivered to Jérôme, the final end user. So far, he's been extremely satisfied with what he have seen and no wonder why. He's an operation fan and I feel this layout will fit his needs perfectly.
Sunday, 9 August 2015
Ground Cover Over
Mark this day as it is the first time in 2 decades I ever complete ballast and ground cover on any layout I ever built.
Ballast is a mix of various dirt, sand, sandblasting sand and charcoal. It's only a starting point as I'll have to adjust coloration here and there with washes, pastel powders and various material. Harlem Station was a very dirty place to be. Some weeds will also be needed here and there.
Friday, 7 August 2015
Landmark
Lot of stuff happened during the last two days. I won't waste my time struggling with futile words.
First, I painted the carfloat. After a basic coat of Krylon camouflage brown, I decided to try a method I once heard but never really applied. Instead of building the weathering pattern with several layers, I just used heavy washes of cheap acrylic paint including burnt umber, burnt sienna, Payne's grey and yellow ochre. Those water-based washes were really liquid and I dabbed and stippled thinned paint here and there. The idea was that those "floating" colors would merge together instead of drying. Some colors pool here and there. The nice thing is that the puddles leaves a very realistic weathering pattern. So far, I did the operation 3 times. I plan to lighten the overall color a little bit again with more drastic contrasts. I was once told in my teenage years that my drawing skills were good but that I was too shy to add light and shadows. Since then, I try to fight that natural tendency! With little success! Other weathering technics will be used, but I feel this technic is worth using. Very fool proof, no real talent needed, physic laws do the job for you.
Next project was to build the iconic Erie bridge crane (not sure it's the good name for that thing). Getting the thing right was very important because this crane is visible and easily recognizeable on every Harlem Station pictures. That's the mascot! I used Central Valley bridge parts. Well, I completely depleted my stock and had to butcher my CNR Courtesy and Service bridge! Oh well, you can start throwing rotten tomatoes! Wood used was custom cut cedar patio planking leftover from my last week home improvement project. I stained the wood with tea and coated them with my steel wool/peroxyde mix. The mix is now more than a week old and works even better. The black painting was done with India ink and alcohol. The "Erie" lettering was drawn to scale from picture. This is the REAL thing, not some "quite similar" font. I printed them on Walthers decal paper, coated with dullcote. My first try was a few years ago when I did my QRL&PCo gondolas and hoppers. Back then, I used Krylon flat finish and the decals ended very thick and hard to work. With dullcote, they stay very thin. That's the way to go. Still a long way to go before this crane is completed, but the basic work is now done.
Finally, I also started to ballast tracks with several material taken in the backyard: sand, dirt and some wood coal. My first mix add too much fine powder. It really makes it hard to glue. I finally decided to resift the dirt several time outside in the wind to get rid of the fine particles and keep the rocks.
First, I painted the carfloat. After a basic coat of Krylon camouflage brown, I decided to try a method I once heard but never really applied. Instead of building the weathering pattern with several layers, I just used heavy washes of cheap acrylic paint including burnt umber, burnt sienna, Payne's grey and yellow ochre. Those water-based washes were really liquid and I dabbed and stippled thinned paint here and there. The idea was that those "floating" colors would merge together instead of drying. Some colors pool here and there. The nice thing is that the puddles leaves a very realistic weathering pattern. So far, I did the operation 3 times. I plan to lighten the overall color a little bit again with more drastic contrasts. I was once told in my teenage years that my drawing skills were good but that I was too shy to add light and shadows. Since then, I try to fight that natural tendency! With little success! Other weathering technics will be used, but I feel this technic is worth using. Very fool proof, no real talent needed, physic laws do the job for you.
Next project was to build the iconic Erie bridge crane (not sure it's the good name for that thing). Getting the thing right was very important because this crane is visible and easily recognizeable on every Harlem Station pictures. That's the mascot! I used Central Valley bridge parts. Well, I completely depleted my stock and had to butcher my CNR Courtesy and Service bridge! Oh well, you can start throwing rotten tomatoes! Wood used was custom cut cedar patio planking leftover from my last week home improvement project. I stained the wood with tea and coated them with my steel wool/peroxyde mix. The mix is now more than a week old and works even better. The black painting was done with India ink and alcohol. The "Erie" lettering was drawn to scale from picture. This is the REAL thing, not some "quite similar" font. I printed them on Walthers decal paper, coated with dullcote. My first try was a few years ago when I did my QRL&PCo gondolas and hoppers. Back then, I used Krylon flat finish and the decals ended very thick and hard to work. With dullcote, they stay very thin. That's the way to go. Still a long way to go before this crane is completed, but the basic work is now done.
Finally, I also started to ballast tracks with several material taken in the backyard: sand, dirt and some wood coal. My first mix add too much fine powder. It really makes it hard to glue. I finally decided to resift the dirt several time outside in the wind to get rid of the fine particles and keep the rocks.
Subscribe to:
Posts (Atom)