While I'm not into the "It's my railroad" mindset - which is too often a lame excused given to overlook blatant lack of efforts or self indulgence - I do agree we have to take shortcuts some times. Depending the scope of your project, maybe 100% accuracy isn't required by your project.
In the case of Harlem Station, nothing exceptional ever happened there. The fleet of cars was mundane and generic: boxcars, hoppers, flatcars and gondolas. Nothing worth writing to your mother. The only thing that stood out was the motive power and it's why I made a lot of effort to get it right. It's an attention grabber easily identifiable by anybody having a minimal knowledge of New York harbour operations.
On the other hand, it's not worth putting to much time on the freight fleet. In fact, mixing high quality model could be a mistake because the huge difference in quality will show off. It's why I decided to keep the investment in such things as metal stirrups and grabirons minimal.
Nevertheless, even if you use foobies to populate a layout, there's a few rules to follow if you want the global picture to be believeable. Let's break them apart:
1) Dimensions / Proportion
Your car can have the wrong grabiron, the wrong doors, the wrong brakewheel or roofwalk, but you won't fool anybody if the general dimensions are wrong. In my case, a 40ft high side gondola is a poor stand in for a 46ft low side gondola. For boxcars, I'd say paying attention to door type does pay off in the end because it is one of the most identifiable detail on a car.
2) Colors & Paint Scheme
Color is the most recognizable aspect of any objet after its shape. There is no shortcut here: get the right color and paint scheme according to your prototype. Any cheap but mildly decent car with a good paint job will look good. Tyco Forums' user Srenchin prooved it one for all by to improving Tyco 50ft plug door boxcars. In fact, it's worth scrolling through the entire thread because he develops new technics and approaches to improving fifty of them. There's a big lesson in humility there since the final product is far to be a botched pile of scraps.
Also, remember when I talk about using regular oxyde red paint? Here's a comparison between two identical cars. The bottom one was faded then covered with a coat of road grime. You can see how a not so prototypical color can be altered easily to match any other shade of boxcar red required.
3) Weathering
Anything looks better with a good coat of reality. Without minimal weathering, a plastic car will always looks like plastic. You need some fading, grime and flatness to fool the eyes believing it is steel. Once you reach that step, you know you're on the right part.
By following these 3 rules, your cars are already better than any accurate model out of the box. It also reminds us prototypicalness isn't only achieved by reproducing accurate details, but also by making the model realistic.
Now, let's look at my current gondola project.
I need gondolas for Harlem Station, but I have no suitable prototypes. On my shelves, I have a bunch of five cheap Model Power 40ft high side gondolas bought years ago at 5$/each. I lettered them CN, applied some weathering back in my experimenting days and operated them on the previous Hedley Junction layout. Unfortunately, I no longer have use for them since I have acquired better CN gondolas.
Meanwhile, I found discounted CDS dry tranfer for Pennsylvania and New York Central gondolas which would be suitable for my era. Unfortunately, they are for 13-panel 46ft low side gondola. But while looking at the Model Power gondola, it's clear I can extend it by adding few panels cut from another shell. Adding two panels makes it a 48ft long 12-panel gondola. Not exactly a perfect match, but far better than the original model. With minor modification by following PRR G22-class car, we should be able to build good foobies.
Thus, out of 5 gondolas, one was sacrificed and sliced in 4 parts (2 panels long). The other gondolas were cut in the middle and spliced together. When dried, I lowered the high sides using my trusty table saw. It can sound a little bit overpowered, but trust me, it makes it a quick and dirty operation. Once again, always work with extreme prudence when cutting styrene with a table saw. Plastic is treacherous.
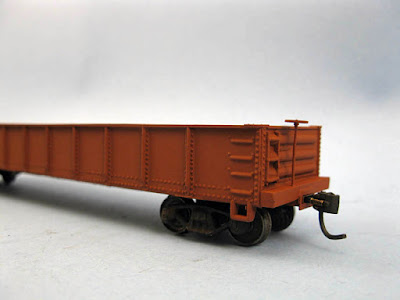
Once done, I glued styrene stripes on top of the car, added characteristic steel sill on end and relocated the weight. The underframe was extended with styrene bits while an Accurail handbrake was installed on a brass rod.
On the future NYC gondolas, I removed the upper rib on the car ends to leave more space for the decals. The NYC cars are equipped with lower brake staff than the PRR to follow some prototype pictures I saw. New Kadee coupler pockets embedded in the end sills were added while metal replacement wheelsets were installed. Model Power trucks aren't very well defined, but they are not that ugly either and they operate quite decently. I see absolutely no reason to replace them.
To be noted, new wooden floors will be added inside the gondolas to hide the savage surgery that occured!
And now, here's the final product when painted and awaiting decals. I must say there is very little evidence that can tell the origin of the car.
That said, more cars to come in the following weeks as I try as much as I can to complete a decent fleet. More coal hoppers and boxcars.


No comments:
Post a Comment