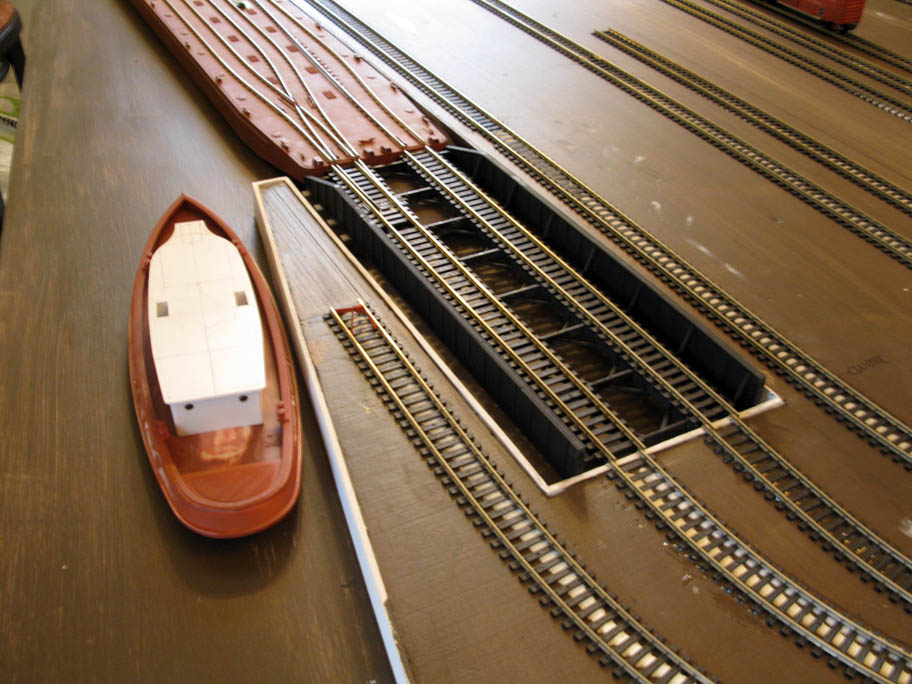
An image is worth a thousand words. Since this blog ain't about chitchat but about modelism, let's take a look at progress so far.
Yesterday, I painted the track with Krylon excellent
camouflage brown. This is really a nice basic color to paint both rails
and ties. Some washes and subtle colors will be added later to weather
the track closer to prototype.
I also completed the carfloat apron with some details scavenged from
Walthers' apron and with bits of styrene. I'd say the apron is about 90%
complete. Need to get some parts and prepare wood for the deck
planking.
Today, I cut and installed the concrete pads. These were made with 2mm
cardboard. Quite thick, but cutting was far easier than I expected. It
took me all day to prepare them. Next steps is to add the concrete curbs
per prototype and paint them. It's going to be tiresome... but once
done, the most annoying model railroading activities will be behind me
as I'll venture in real scenery works, which I rarely do.
Friday, 24 July 2015
Wednesday, 22 July 2015
Laying Track in a Day
I've never been that much fast while laying track.
Today I started to lay track at 7AM and ended at 7PM, including about 1 hour break for lunch & diner.
Track was glued with latex caulk. It went surprising fast.
I'm glad to have bought a long aluminium straight edge. So far, it's been my best purchase of the year. Can't believe I lived without one for such a long time.
In some spot, mainly near the carfloat apron, I used 5-minutes epoxy because radius is very very tight. Small brass pins were inserted into the concrete wall to make sure rails would stay aligned.
I'm quite proud of the final result. It took me about 5 years to "complete" this project since my first attempt was kindly published by the late Carl Arendt, but I'm glad I started over. The actual layout is probably among the most accurate rendition of this small terminal and it's fun to see it taking shape. I did some operation and was happy to find out my trusty Atlas S2 was able to navigate the very tight radius, some less than 12 inches.
Today I started to lay track at 7AM and ended at 7PM, including about 1 hour break for lunch & diner.
Track was glued with latex caulk. It went surprising fast.
I'm glad to have bought a long aluminium straight edge. So far, it's been my best purchase of the year. Can't believe I lived without one for such a long time.
In some spot, mainly near the carfloat apron, I used 5-minutes epoxy because radius is very very tight. Small brass pins were inserted into the concrete wall to make sure rails would stay aligned.
I'm quite proud of the final result. It took me about 5 years to "complete" this project since my first attempt was kindly published by the late Carl Arendt, but I'm glad I started over. The actual layout is probably among the most accurate rendition of this small terminal and it's fun to see it taking shape. I did some operation and was happy to find out my trusty Atlas S2 was able to navigate the very tight radius, some less than 12 inches.
I took some minutes to test and operate the layout. I can already say it will be a very fun small layout to operate. Next step is to spray paint the track before moving to scenery.
Tuesday, 21 July 2015
Kitbashing a Carfloat Apron - Part 1
I completed the benchwork this morning, primed and painted everything that was repaired with flat brown latex.
Then, I switched my attention to the carfloat apron as it is a key element when laying track. I came to the conclusion Walthers' apron is far to be great. In fact, it doesn't make sense as the bridge doesn't have any structural member under the decking. I decided I would be better off doing something myself.
The carfloat apron is made from 3 Central Valley 72" plate girder bridge. Harlem Station used a 100 feet pontoon type brige thus I had to enlarge substantially the CV bridges. It was an easy kitbashing that took an afternoon. Later, I'll had some Frenchman River Models details on the sloped parts. The rounded corners were also traded for square ones according to prototype. The track is Atlas Code 100 and the turnout is a PECO long turnout cut to length to fit Walthers barge. Later, everything will be planked with real wood decking. I'm not sure if I'll reuse some details from the Walthers apron. I'm eager to keep it intact in case I was to use it for some other projects one day. Who knows! Tomorrow, I'll add the second track and complete the pontoon which I already started to build. I'm quite lucky to have a blueprint from the prototype. Make things easier. Hope to start laying track maybe in the afternoon.
Structural members were cut using a band saw. My goal was to glue the parts by splicing together a beam for a stronger bond. Don't mind the horrible zigzag cut, it was sanded down smooth before gluing parts together.
Using template is the only way to get reproductible results. It made this job as easy as 1-2-3. The slope is the same as Frenchman River Models apron kit so I'll be able to use their jacking apparatus.
Saturday, 18 July 2015
Beyond the Accepted Truths
My work as an architect specialized in historic buildings has made me aware that you can't never take what someone tells you at face value. My best comparison would be Columbo as impersonated by Peter Falk. Whatever he is told, if a tiny details doesn't fit in the larger scene, you may be sure he will do all he can to fit the truth. In my professional practice were time is money, very people care to go beyond assumptions because it would call for incertitudes. But don't be fooled, what they neglect in design always end up in costly modifications at a later stage with errors and mistakes.
That said, most of us that studied Harlem Station came to take a face value the big Erie's billboard at 148th Street/Exterior Street's corner: "Entrance on 150th Street".
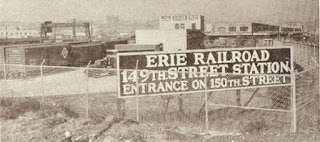
That small sentence made us all believe the ONLY access to Harlem Station ground was on 150th Street. But today, after close examination of landscape around the station, I came to change my understanding. Unfortunately, as stated before, I can't publish those pictures and wish to respect the kind gentleman that was generous enough to give me access to invaluable data. However, a few pictures from Trainweb.org will help to set my discoveries.
Here are a few things I always thought didn't make sense. First, there is a concrete pad on the pier near the carfloat. This concrete pad isn't connected to any other road, circulation and concrete pad on the property, making this area unreachable to vehicle. In fact, I always wondered why such a concrete pad was there and thought both isolated sidings where only car storage.
But this started to change when I discovered the siding perpendicular to Harlem River along 149th Street was in fact used by a coal dealer. Looking at pictures, a truck coming from 150th Street entrance would have to cross a maze of turnouts to reach its destination. The funny thing is that you won't see any evidence of a road or a trail.
Looking at a few pictures, I found out the concrete pad by the river was raising slightly toward the south. In fact, the concrete pad is raising because the small street north to 149th Street Bridge embankment is higher than Harlem Station grounds (about 6 feet sloping gently toward the river).
The answer lies in the next picture:
I have access to high resolution version of this photograph. On the upper left, you can see a hopper spotted on the siding perpendicular to Harlem River. At the hopper's right, the coal dealer shed is clearly visible. But upon closer inspection, at the hopper's right you can see an overhead structure on the fence. That structure is a common type chainlink gate.
Thus, the riddle is solved. If Harlem Station main entrance was effectively located on 150th Street, there was a secondary entrance located east to 148th street near the river. This gate gave access to a coal dealer but it could have been more. The concrete pad is well-known to have reached as far as the carfloat apron, thus servicing the siding parallel to it. Does it means this short curved siding where we often see cars spotted was in fact another tenant? I'm seriously think it was.
May I say I'm quite happy to have include about 1 inch on the perimeter of the layout to model a glimpse of surrounding topography. Now, I have a very nice detail to model and that will add more operation interest.
As a certain famous fiction character would have said about the recent Pluto Flyby: Fascinating!
And just for fun, here are some progress pictures of the layout. Today's historical discoveries were directly fuelled by my need to make a correctly shaped fascia in that area.
That said, most of us that studied Harlem Station came to take a face value the big Erie's billboard at 148th Street/Exterior Street's corner: "Entrance on 150th Street".
![]() |
| Erie Railroad Magazine - February 1952 issue |
That small sentence made us all believe the ONLY access to Harlem Station ground was on 150th Street. But today, after close examination of landscape around the station, I came to change my understanding. Unfortunately, as stated before, I can't publish those pictures and wish to respect the kind gentleman that was generous enough to give me access to invaluable data. However, a few pictures from Trainweb.org will help to set my discoveries.
Here are a few things I always thought didn't make sense. First, there is a concrete pad on the pier near the carfloat. This concrete pad isn't connected to any other road, circulation and concrete pad on the property, making this area unreachable to vehicle. In fact, I always wondered why such a concrete pad was there and thought both isolated sidings where only car storage.
![]() |
| Track Planning for Realistic Operation, Second edition, by John Armstrong, Kalmback Publishing |
But this started to change when I discovered the siding perpendicular to Harlem River along 149th Street was in fact used by a coal dealer. Looking at pictures, a truck coming from 150th Street entrance would have to cross a maze of turnouts to reach its destination. The funny thing is that you won't see any evidence of a road or a trail.
Looking at a few pictures, I found out the concrete pad by the river was raising slightly toward the south. In fact, the concrete pad is raising because the small street north to 149th Street Bridge embankment is higher than Harlem Station grounds (about 6 feet sloping gently toward the river).
The answer lies in the next picture:
![]() |
| J. Long photo, D. Biernacki Collection, J. Held Archives |
I have access to high resolution version of this photograph. On the upper left, you can see a hopper spotted on the siding perpendicular to Harlem River. At the hopper's right, the coal dealer shed is clearly visible. But upon closer inspection, at the hopper's right you can see an overhead structure on the fence. That structure is a common type chainlink gate.
Thus, the riddle is solved. If Harlem Station main entrance was effectively located on 150th Street, there was a secondary entrance located east to 148th street near the river. This gate gave access to a coal dealer but it could have been more. The concrete pad is well-known to have reached as far as the carfloat apron, thus servicing the siding parallel to it. Does it means this short curved siding where we often see cars spotted was in fact another tenant? I'm seriously think it was.
May I say I'm quite happy to have include about 1 inch on the perimeter of the layout to model a glimpse of surrounding topography. Now, I have a very nice detail to model and that will add more operation interest.
As a certain famous fiction character would have said about the recent Pluto Flyby: Fascinating!
And just for fun, here are some progress pictures of the layout. Today's historical discoveries were directly fuelled by my need to make a correctly shaped fascia in that area.
Knowing your limits... to move forward
Well, things are going fast since the benchwork had been completed. Previously, I said I would add a layer of cork so I could nail the tracks, but I finally decided agains it.
My reasons are many fold. First, rolled cork is always hard to glue in place without kink here and there. Second, I didn't have enough cork to cover the entire layout and didn't want to induce delay buying more. Third, I thing I invested already enough money in the benchwork. Fourth, the more material you layer together, the more chances are you induce undesired surface ondulations. Fifth, Walthers apron and carfloat are 1" high which fit perfectly the 1" styrofoam. Adding the cork would only more elevation, which translate into a steeper grade on the apron.
So, let's keep things simpel and move forward.
I also applied a coat of flat exterior brown paint to the styrofoam and water body to have a basic scenic color to work with. Since Harlem Station was a very muddy and dirty place, that dark brown seems a goof fit. As for Harlem River, I suspect it's water are everything except tropical blue! Can't wait to continue working on the layout! But there's a big challenge as I must build the concrete piers and carfloat apron as quickly as I can if I doesn't want to delay the building process.
So, let's keep things simpel and move forward.
I also applied a coat of flat exterior brown paint to the styrofoam and water body to have a basic scenic color to work with. Since Harlem Station was a very muddy and dirty place, that dark brown seems a goof fit. As for Harlem River, I suspect it's water are everything except tropical blue! Can't wait to continue working on the layout! But there's a big challenge as I must build the concrete piers and carfloat apron as quickly as I can if I doesn't want to delay the building process.
Subscribe to:
Posts (Atom)