Tuesday, 25 September 2018

Toward A New Home For Harlem Station


While this blog isn't very active, Harlem Station is still going strong behind the scenes. The layout itself is now in storage waiting to be housed in a new hobby room I'm planning to build in my basement. Also, I've have continued acquiring rolling stock over the year to build up the fleet. It is my hope the layout will find its new home by Christmas Holidays if everything goes according to my plan... and we know life never follow plans!


Parameters


Trying to fit an island layout into a new room isn’t an easy task. No wonder this kind of design has lost favor of most modellers over the years. They quickly eat up space when you take into account decent aisles where an around the wall design would be much more compact. But reality is reality and Harlem Station is indeed an island design in real life. It couldn’t have been done otherwise.

Knowing that, I’ve started to look at my options and to better grasp the reality of the project, it was wise to set a few parameters that can’t be fiddled with. From the start, I decided to have aisles that would be about 42 inches wide. I know it is quite generous, but I’ve always felt the standard practice of 30” was a minimum rather than a recommendation. Operation is one thing, another is having enough space to work or build the layout… and to have enough space to contemplate our work. I see no point giving our best on a layout only to display it poorly.

Once I had to determine the layout and aisles footprint, I was ready to design the room. I know for sure I want an entire wall dedicated to my workbench, including a spray booth and a computer. I have an old desk about 60” long by 30” wide that serves me well for this purpose, so let’s consider we need a good 30” wide area for these things and add some more inches for the chair. Shelving and storage will be provided and several power outlets are required. Since the basement walls are stone masonry and can’t be hidden with new finishes, this modelling station should be located on a new interior wall to make my life easier with electrical wiring.

Another key aspect is the future Temiscouata Railway layout I’m planning to build in the future. This layout requires about 17 feet long to accurately replicate Connors, NB without any compression. This is a condition I’m not eager to sacrifice since I know longer believe compressing railway scenes when not required.

I have also some diomara ideas, but theses won’t require a lot of space and could be hanged on brackets over Temiscouata layout staging area.

A final key design element is that I have accumulated an extensive collection of rolling stock over the years and it is getting harder and harder to find a particular item among 300 or 400 boxes. If possible, I’d like to use the space under the Temiscouata layout as a storage area. It could be made of cupboard or shelving units where cars could be picked up easily. For Harlem Station, I’m thinking about using a small service table on caster to stage cars and store them under the layout.

Putting Things Together


Proposed hobby room layout

Architectural design, like any other design process, required a balance between technical requirements and aesthetics. Too often, we take a room and put a layout into it, not thinking how it will look. If Hedley Junction taught us a lesson, it’s that large aisle can truly make a layout stand out and that locating a nice scene on the peninsula, which grabs visitor’s attention when they cross the door step, is a mission statement in itself.

For my hobby room, I want the same thing. The layouts should command the area and be the main focal points. Modelling is an art and should be displayed as such. I particularly like the idea of Harlem Station standing in the middle of the room, basking in light and set up on a well-crafted support. Imagine a billiard table and you’ve got a got idea of what I have in mind. Some cozy, that focus your attention on the layout as if it was a game and where it is enjoyable to spend some quality time operating with friends.

As a backdrop to this, Temiscouata Railway can be seen on the exterior walls, creating a backdrop that wraps around Harlem Station. It would also be carefully lighted and supported by nicely finished storage units.

Now, think about the lighting. Depending on which task you are performing, you can turn on Harlem Station independently from Temiscouata, helping you to focus on what matters.

As a final touch, instead of creating a bland room, large windows will be installed in the new wall so the layout room isn’t simply a box, but rather an environment basking in light and that can breathe. Finishes will probably be painted wainscoting with trims and old colors similar to what was common in railway architecture. Not too fancy, just some character to give personality and warmth to room.

In my modelling life, I’ve seen many modellers that can be considered the best of their trade. Their work is exceptional and breath-taking, however, how many times were I completely flabbergasted to see my favorite work to be literally buried in the most unimaginable mess ever. On the other end of the spectrum, you’ll also find great layouts but display in an aseptic environment basked in monotone fluorescent lighting. A part of a layout success as a lot to do with how we display it, be it in terms of enjoyment, operation and construction.

Wednesday, 3 January 2018

Car Fleet Building Update

As Christmas holidays still continue for a second week, some sizeable progress can be observed on my Harlem Station fleet. As I previously mentionned, the program is plagued by several issues and setbacks, nevertheless, it is still moving forward. Let's take a look at the most recently completed cars.

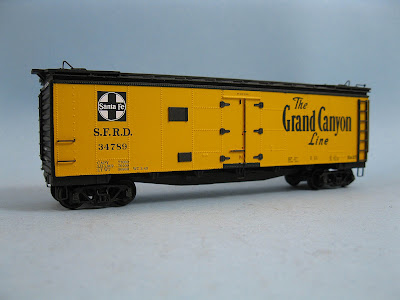
C&BT Shops SFRD reefers are now almost completed. Paint and details are done, lettering is progressing. The first car was lettered using the old SFRD paint scheme with the slogan and curved lines map. Most of these cars were repainted by 1952, so I decided to get more modern decals to complete the second car. The older one will probably be buried under a generous coat of weathering later.

While we can complain - and I did - the C&BT reefers are far to be the best option available, with some care they can be turned into nice looking models. I wouldn't do it again, but I certainly won't shy away operating them on the layout.


Rapido GARX 37ft meat reefers were build from kits and custom painted. As usual, Rapido did an excellent job with this car. The GARX yellow reefer is lettered using Clover House dry transfer. I tried to modernize the paint scheme to better reflect the early 1950s. However, I believe the word "Refrigerator" should be spelled in gothic font but I couldn't find any useful photographic evidence. At this point, the lettering is not sealed, so I could replace the world by a custom made decal later... which I think would be a good idea.

The second reefer was painted in the attractive early 1950s Swift all-red paint scheme. Unfortunately, I found out the Clover House dry transfer I had was made for the 1954-built steel reefer. Since I model 1952, it's too late for my era, thus I ordered a a suitable set of Champ decals. I expect to letter the car with a mix of decals and dry transfer to better fit the prototype and limit as much as possible the use of Champ decals which suffer from thick carrier decal film.


Kadee PS-1 boxcar is a piece of art. This one started as an unlettered model which I partially repainted and lettered to Erie. Unfortunately, I found out later the 90000 series was built in 1947 by ACF. Thus probably not a PS-1 car but rather a modified post-war AAR boxcar. I could end up stripping the paint and redoing it in another suitable paint scheme later on. By the way, the Erie logo is a homemade decal to replace the incorrect Tichy one.

If anybody has information about Erie PS-1 boxcars, let me know.


The next project are USRA single sheathed boxcars made by Tichy. They are lettered to PRR and Long Island Railroad with doors specifically choosen based on prototype pictures. Very straightforward kits to build.


The last one is a Tichy rebuilt USRA boxcar lettered to P&LE. The car itself is easy to build and looks great, however, I quickly found out the decals were slightly wrong. However, I decided to keep them for the sake of sanity. My only problem with this car was that I didn't thin enough the Future Floor Finish used as a gloss coat before decaling. It resulted in a kind of bumpy surface that made decaling harder. I could have fixed this but I was too lazy... forgetting it would be a real waste of time later... How well!


As you can surmise, they are many other cars on my benchwork right now, but their completion stage isn't worth a mention here.

Tuesday, 2 January 2018

Reefer, Decals, Frustration and New Year

What an auspicious title for the new year! Don't panic, I'm not discouraged at all but trying to be fairly prototypical with a steam era fleet can quickly become a descent into madness... madness I tell you!

The good new is Erie did lease URTX reefers from at least the 1930s up to the E-L merger in 1960. I was able to find a picture of the real wood sheathed 40ft prototype Accurail based their concept on simply by looking at Wikipedia's Union Refrigerator Transit Line entry.

URTX cars on pier 19, East River, Manhattan. 1936 (credit: WikiCommons)
Not only it matches the paint scheme, but Accurail used a fairly prototypical model too. Unfortunately, I have absolutely no idea if these cars were still in service in the early 50s and leased to Erie.

According to information shared by Dave Husman, 16 cars were still on the roster at that time, corresponding to the series leased by Erie:

"The 1953 ORER lists 16 cars in the URTX 27000-27999 series.  IL 32'9", OL 40'11",   Other dimensions are pretty common with most of the cars on two pages of the ORER.  There are no other indications of ownership or assignment (on any of the other series either.)"

Thus, I feel it's better to not bother with theses oddballs. However, Accurail will soon release an Erie steel ice reefer. And that time, it both fits the era and the paint scheme is quite accurate too. But unfortunately, while the artwork is excellent, the model itself isn't Accurate. URTX used the well know steel reefers with the horizontal seam. Often associated with Milwaukee Road, this type of reefer was also leased by Erie. Walthers did produce in the past that specfic prototype and it could be used to create a decent version of an Erie reefer... however, here my rant starts.

Accurail's version of Erie steel reefers (credit: Accurail)

In the world of modelling, either you have the correct decals but not the model or the accurate model exist but not decent decals. I ran into this issue quite a few time over the last few weeks and it can really wear off your best intentions.

In the case of Erie reefers, the lettering was black, so I could make my own decals. In fact, I did start to recreate the artwork based on Accurail's own. But I ran in two issues. Very small lettering is impossible to decipher on pictures (that can be solved with the help of other modellers) and getting a decent Railroad Roman font is almost impossible. Every road had its own variation on that popular style. It thus means I will have, if I continue this project, to redraw individually each letter. I'm used to doing this, but it's a labour of love... Maybe I'm not that much in love with Erie!!! The layout option would be to buy an Accurail model, scan or take a high quality picture of the artwork, scale and clean it, print decals and voilà! That would be efficient thought costly. And the Accurail car would have to be repainted in a correct scheme later...

The other issue is much more bothering. I bought 2 Rapido GARX reefer kits 2 months ago. Built them and painted them. One in yellow to represent a generic GARX (not leased) car and another one to be a red-color Swift reefer. Fine by me, but imagine my disappointment when I discovered my Clover House dry transfer were for the SWIFT steel reefer and not the WOOD one... A little search shown me the Walthers steel reefer of URTX lineage would be perfect for the Clover House transfers... However, I have on hand wood reefer. Thus I thought to myself, let's find correct Swift decals. In all my juvenile naïveté, I felt it would be a walk in the park since Swift red wood reefers are iconic and popular with railroaders. So wrong. Only, Champ offered decals (readily available on Ebay) back in the days. While they seem fairly accurate, these decals are printed on very thick carrier paper, making them less than adequate. I've used them in the past, and wasn't that much impressed. So now, the only remaining option would be to get Champ decals, scan them, clean the artwork and ask some individual or business to print them... That will come with a fairly high price tag.

The most frustrating aspect of this adventure is not the lack of availability. You can't do nothing about that. But rather that I embarked these projects thinking they were simple and fast to complete. Who would believe modelling Swift reefers is so complicated? I did not... Now I know... "and knowing is half the battle won"...

Happy New Year to One and All!


EDIT:


Finally, I decided to rework the decal artwork and tweak each Railroad Roman letter to fit UTRX practice. Two hours later, I'm quite satisfied with the result. White lettering on the black ends could be done using any generic freight data decals and alphabets in Railroad Roman font. Now, if I could know if the Erie Diamond logo had a white background or if it was simply left yellow...


URTX-ERIE steel reefer decals (credit: Matthieu Lachance)

Meanwhile, I found another HO scale ERIE steel reefer artwork (supposedly from Accurail too). This one is dated 1956... The car is orange like the Milwaukee Road ones and URTX full name is dropped while the reporting marks and roadnumbers are painted in a much modern block lettering font. Another foobie? Another variation? Hard to tell, except if digging in an URTX dedicated book.

A mid-50s paint scheme? (credit: Accurail?)

Why not try to reproduce this one too!

URTX-ERIE steel reefer decals (credit: Matthieu Lachance)
As things are standing out right now, I'll simply acquire two Walthers Mainline Steel Reefer, strip the paint and letter them in both 1950s paint scheme. If better information ever come up, it won't be too hard to repaint them more prototypically.