Saturday, 30 July 2016

Painting and Weathering a Cheasapeake & Ohio Boxcar

Some projects don't need to be extravagant to be fulfilling. Building a decent fleet of cars for Harlem Station is one of them.

The ubiquitous Athearn 40ft boxcar is among the most common model you can find. Most people have a lots of them, often laid aside as they are replaced by better looking models. In my case, many of them sports paint schemes that won't probably be ever required by any layout Icould wish to build.

On the other hand, I recently purchase a lot of CDS Lettering dry transfer sets at discount price. Among them was a Cheasapeake & Ohio 1954 boxcar set which was an almost perfect match for a car I once spotted on Harlem Station pictures.

It didn't take me long to strip the paint with Super Clean and proceed to paint it with Krylon Red oxyde primer. This paint is perfect for a wide array of cars. The flat finish has enough tooth to apply directly dry transfer lettering and it is also extremely easy to weather. In fact, while this primer can look very red for certain prototypes, be aware you can darken easily by airbrushing a mix of India ink and 70% isopropyl alcohol. When weathered with powders, but also with artist oil washes, very deep gradient of color can be achieved. In fact, reproducing the same effect with regular hobby boxcar red doesn't yield exceptionally better results.

Applying dry transfer lettering isn't my cup of tea. In the past, I used pencil to rub the letters on with mixed results. Also, placing the artwork on the model can be tricky. However, dry transfer doesn't leave ghost film lines and doesn't require to wait for decals and chemicals to cure. That said, the crispness of  the artwork isn't always stellar.

Blending stumps can be found for a dollar or two at most craft stores and last a long time

For this particular project, I decided to do things differently and searched my art supplies from college days to find something suitable to burnish the lettering. I came upon an old paper blending stump used for creating fading effect when drawing. The stump is sturdy enough to sustain the effort required, but it's relative softness makes it perfect to apply a good deal of force on the transfer film without distorting it. I didn't experience lettering cracking badly and the relative large surface made the process quick and efficient. I never tried metal ball burnishers, but definitely, the paper stump does an excellent job and conform itself very well over seams, raised details and rivets.


For the rest, I dullcoted the model, faded the paint with a tan wash, airbrushed the model with some light passes of India ink and alcohol and finally touched up the roof, placards, hardware and rivets with weathering powders. I didn't try to make the model a rust bucket since it would be about 2-3 years old on my layout.

 
In less than 30 minutes, a very generic and crude model became an excellent approximation of the real thing. Once again, I remind you a realistic weathering job done with some restrain is the most important feature required to make a car prototypical looking. Our brain will recognize colors and textures before the small details. If you can afford better models, then it's even better!

Tuesday, 26 July 2016

Coal Conveyors

 
A freight terminal without coal conveyors isn't a freight terminal. We recently acquired a set of Walthers old time coal conveyors. Some complain this model is too often seen on layout, but they were ubiquitous in real life. Look at old pictures, they are everywhere. Sure, the model is a little bit crude, but when correctly painted, it doesn't look bad and play well its role... at least, enough for our purpose.


Easy to assemble, the conveyors were spray painted with red oxyde and camouflage brown  to give them a random coloration. A dark metallic grey was applied over the wheel steel tires and a generous coat of weathering powders was brushed over the model.


The most interestinf feature of these models is the fact you can move them around depending who freight car traffic is handled. Leaving a conveyor under a hopper can be an easy way to tell an operator the car isn't completely unloaded yet and must be respotted.


Sunday, 17 July 2016

Painting a Roundhouse Boxcab - Part 2

Here's the completed boxcab with painted trucks and underframe. The was sprayed with a coat of dullcote. I don't expect to work on the wiring until next week, so the project will be on hold for a little while before I weather it.


Saturday, 16 July 2016

Painting a Roundhouse Boxcab

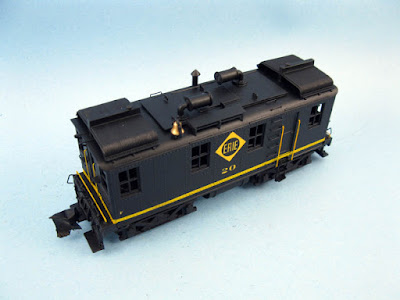
Here's the locomotive with a coat of paint and decals. Decals are Microscale Erie Steam Locomotives (1930-1950). I couldn't source locally diesel decals and found out the steam ones were perfectly fine for the job. Why bother wasting time ordering a set when the available one suffer from no discrepancies except for the small letter "F" indicating the engine front end.


Friday, 15 July 2016

Detailing a Roundhouse Boxcab


Over the last few days, I scratchbuilt the many details specific to Erie #20 boxcab. Over its life, this locomotive saw many changes to its cooling devices and exhausts. I decided to set the model in its later appearance when the paint scheme was simplified in the mid-50s. This locomotive, with boxcab #19, was scrapped in 1958. I'll only need to add details to the pilot and the model will be ready to be painted and decalled.


Sunday, 10 July 2016

Remotoring a Roundhouse Boxcab


The defunct Model Die Casting used to make a nice little boxcab kit in plastic. For years, it's been a favourite of modellers who wanted to get a boxcab at a decent price.


Unfortunately, the motorization is absolutely garbage. I tried a few time to figure out a way to salvage as much as I could from the old drive, but came to the conclusion it was useless. In fact, the way trucks are powered by middle of the engine makes it absolutely unable to manage sharp curves. Given Harlem Station sports prohibitive 13.5" radius curves in some parts, I had no choice but to think about an alternative.


However the year, a common trick had been to replace the original drive with a Bachmann GE 44-ton drive. The most popular method is to sit the boxcab shell onto the 44-ton frame. Most people keep the pilot of the GE switcher which is plain wrong and looks silly. Also, the GE truck sideframes are kept in place emphasizing the weird look of the loco.


To be noted, the GE wheelbase, wheel diameter and wheel spacing are wrong too. Now, I had a challenge in front of me. How to make the GE 44-ton mechanism more acceptable and prototypical.


The new styrene undreframe
The first thing I did was building a styrene frame of similar size than the original metal frame to which I would attach the MDC "correct" pilots. It was a fast and easy build. Vertical styrene walls were built to prevent the frame to warp. They also provided a nice surface to add self-adhesive lead weights which is always a good way to improve performance. There's still a lot of space for a sound decoder and speaker.


Lead weights added to the new frame
The next step was the trucks. I decided to accept the wrong wheelbase as an inevitable trade off. However, the small GE 44-ton wheels had to go. Fortunately, the person who sold me the kit also provided an European Bachmann streetcar drive. The drive is exactly the same but the wheels are the correct diameter for a boxcab. It was just a matter of swapping the wheels and that big problem was now a thing of the past.


The shell is sitting to high on the frame

The last thing I wanted to correct was the sideframes. While the Roundhouse sideframes are a little bit crude, they are still better than keeping GE trucks. To make them fit the new drive, I cut the metal pins behing the truck, grinded the bushing behind the journal boxes and slightly reduced the depth of the peg securing the sideframe to the truck.


One could get rid of everything located at the back of the sideframes
With drill bits and cutoff wheels, I was able to notch the metal peg in such a way the sideframes could be mechanically attach to the truck's plastic pins. Be aware you will have to take time to adjust the sideframe height. Yes, the sideframe isn't a perfect match for the wheel, but it's almost imperceptible.


If I had to redo this, I think I would grind completely the sideframe metal peg and replace it with styrene. That way, it would be much easier to adjust the height.


Finally, my last modification was to remove about 0.75mm of material on the shell ends to make sur the carbody would sit correctly aligned with the pilot beam. The original Roundhouse design was a little bit weird because it didn't align. Now the shell sit properly!


I'll probably remove large part of the underframe diesel tank. Since I changed the wheel diameter, the trucks can't swivel freely. Also, only an air tank existed under Erie #20 and I'd like to follow the prototype as much as I can. It will also look more prototypical and eliminate the last visible remnant of the GE 44-ton.


Another challenge will be to find a way to mechanically fix the shell on the underframe. I don't have yet an idea how I'll do it. Once done, the fun part starts by detailing and painting the locomotive. It shouldn't be too hard. In that regard, I don't plan to buy parts since I consider this a low budget conversion.

Nice Boat!


Today Harlem Station reached another historical step in its ongoing history. Adding boats to a marine scene is truly the only way to make it believeable.


I finally completed the tugboat "Chicago" today by gluing some accessories. By far, I'm very satisfied by results because there's very little discrepancies with the real prototype. Unfortunatley, I can say the same about my failed attempt to convert the 1:72 Revell Coast Guard Tugboat which could someday end up on another layout or diorama.


Color pictures of Erie tugboats in the 50s show them quite shiny and well-maintained thus I decided to kept Chicago relatively clean.


Saturday, 9 July 2016

The Art of Weathering

Too often we think we need to buy the most prototypical models available. In general, I do agree, but for some project, using more generic model is a matter of time or money. In my case, I'm working from old Roundhouse cars. In the past, I changed the running board, stirrups and grab irons. This is a very fun but  time consuming process. It also makes the cars a little bit more fragile, which is not a good thing for this particular model.

This time, I've used stock models. I didn't upgrade them. However, I decided to carefully weather them using several technics and layers to get a prototypical result. All cars were weathered according to prototype pictures. Lance Mindheim often like to remind us the choice of colors is one of the most crucial part of a layout. I do agree with him and it's why I think weathered cars are much more important than prototypical ones.

You will see that I didn't include any rust spots and rust streaking. This technic is too often overdone and doesn't fit old time cars which were never left to degenerate into rust buckets.

Here's the result after a very busy day changing plastic shells into realistic weathered steel cars.


Saturday, 2 July 2016

A Few New Cars

A fellow modeler from a forum kindly sent me a few old cars to populate the layout. I didn't attempt at detailing them since they are purely operation models. However, I did rectify the color scheme when I could. This is particularly true with the NYC Pacemaker boxcar which got black ladders and saw the sliding door brackets removed and sill painted red.

They aren't prize winning models, but with a good coat of weathering, they should blend perfectly with the fleet of Roundhouse and Athearn cars. I took them as a challenge for improving my weathering skills.

NYC Pacemaker Boxcar (Walthers or Train Miniature)

Before:


After:


PRR 34ft hopper (Athearn)

Before:


After:


50ft Heavyweight Westinghouse Flatcar (Athearn)

This one seems to be a notorious foobie and I doubt seriously they would have used that kind of car on carfloat service! But it is noteworthy to say this cas can take 13" radius curves without problem!


After: